For many software development enterprises, Angular seems to be one of the most preferable web development frameworks to develop single-page application. This kind of application is a bit different as compared with the traditional multi-page application where you might see less or even no page reloading when surfing from page to page. Moreover, Angular also provides a lot of eye-catching customized web controls and powerful features to simplify the steps of making modern design, fast response and scalable web application.
From a test engineer’s point of view, I really love to work with Angular web applications due to their good looking, user-friendly, and impressive performance. However, automating Angular Single-page application using ordinary Selenium WebDriver results in devoting serious effort to stabilize flaky interactions between the tests and Angular’s built-in controls. The reason for this can be easily guessed; Selenium WebDriver itself has very limited support for Angular automation. Luckily, Protractor is here to make our tester’s life much easier, it is built on top of WebDriverJS and has very good built-in supports for Angular pages and controls. Thus, this prospective tool eases our pains of having too much workarounds to make robust test scripts.
From many years of working with both Selenium WebDriver and Protractor as a Software Test Lead, I have accumulated a valuable number of best practices which have helped my teams pave the path to success. Today, I would like to share the list of 15 best practices for building an awesome Protractor Automation framework and hope this list will bring to you some excellent ideas which you can apply right away to your project.
Here is my list of 15 best practices and the pages they are mentioned in:
- Use TypeScript instead of JavaScript
- Page Object is definitely a must-have design pattern
- One TypeScript file, one page object class
- Always have good coding conventions for page objects
- Get rid of TypeScript/JavaScript circular import
- Deal with JavaScript’s asynchronous behavior using async & await
- Wrap up Protractor element and browser original objects
- Page object’s method should wait for the page to be fully loaded before exiting
- ProtractorBy is fastest but XPath is the most stable locator
- Test case should only call page object’s methods
- Do not place assertions inside page object classes
- Have simple but effective project structure
- Only push necessary things to code repository
- Remove boilerplate code of the long and repeated imports
- Test your test code more frequently
Let’s go to the details of each of these best practices from top to bottom.
1. Use TypeScript instead of JavaScript
Using TypeScript gives the ability to add static object types to the traditional JavaScript code as well as substantially boostup code security and informativeness. Moreover, developing complex object-oriented classes becomes surprisingly simple with TypeScript. This language offers many favorite magical keywords such as: class, public, private, protected, static, enum, interface, import, export, etc. We can reuse our programming knowledge to make a large and scalable JavaScript-based project. The modularized code with clear structure and data types will not only result in good development performance at the beginning but also a low maintenance overhead later on.
Most importantly, TypeScript and Visual Studio Code (the free IDE) are the best matching couple which was guaranteed to bring developers excellent coding experience because of the tech giant stands behind them (a.k.a. Microsoft). Besides the great support for the TypeScript language, the early error detection and intelligent code completion features of Visual Studio Code will also bring developers the fast and safe development process.
At any time, we are always able to transpile the developed TypeScript code to plain JavaScript using the TypeScript Compiler without knowing too much about the JavaScript language. And then, we can grab the transpiled JavaScript code and run the test.
2. Page Object is definitely a must-have design pattern
Following the tutorial in the Protractor site (link included), we can easily get a runnable Protractor test written in JavaScript. By focusing on the simplicity of configuration and test implementation, the tutorial has done a great job making newbies quickly fall in love with the new prospective tool.
The following code is an example of a Protractor test written in JavaScript:

It is good to get familiar with Protractor but be aware: bad test design is a universal problem that carries serious complications. The following are the major three:
- Code duplication: The appearance of element objects in the test is a clear sign of bad design. The more tests that need to interact directly with an element, the more duplicated code we need to write within them.
- Maintenance problem: Yes, it’s a nightmare for the one who takes the responsibility of taking care the tests with lots of duplicated code inside. Once the locator (thing we put in the element object between the parentheses) of an element is changed to follow the change in UI, this person in charge of the tests needs to find all the places where it is used and update one by one. It’s even worse if the business of the AUT changes because then even more code needs to be updated sequentially.
- Hard to understand: Guessing the application’s feature(s) for which the script is testing is a tough challenge for outsiders, even for the person who wrote the test just a little while ago. With many technical keywords such as: element, by, sendKeys, click, etc. Automation teams will need to spend some extra effort adding comments for each test to describe what is going on in each line.
It’s clear that we really need a good design which helps eliminate all the troubles listed above. Among many design patterns to develop test cases, Page Object stands out because of the great benefits it brings to the Automation teams. Since the way we use Protractor is quite similar to using Selenium WebDriver, we can apply Page Object to our test design to stay far away from bad design problems.
3. One TypeScript file, one page object class
By only defining a single page object class in a TypeScript file, along with user-friendly names for the class and the file, our project will be much more manageable and recognizable no matter of the project’s size (small or large-scale). It is surprisingly easy to find a class or file when designing our page objects this way, so developers should never struggle to look up for any page object class.
Here is an example of a page object class which encapsulates the Login site.

The two keywords “export” and “default”, which are placed before the declaration of the class, are a bit strange compared against C# or Java. Literally, those keywords mean as follows: this file contains only one class and it is also visible in another classes once imported. You can see an example of importing a default class in line number two which doesn’t need a pair of curly-brackets enclosed.
4. Always have good coding conventions for page objects
This will help to make our code highly consistent and also increase the maintainability of the framework later on. Below are rules worth your consideration.
- File name which contains page object class should have the identical name to the title or header of the AUT page. The name should be in lower case separated by a dash “-”. For example, according to the Login page from the AUT, the filename will be login-page.ts.
- Name of the page object class should share the same idea with the file. However, class’s name should be in CamelCase with first letter in uppercase. For example, LoginPage.
- The access modifiers of all page objects’ elements should be private, on the other hand, in the base class or superclass, they should be protected. This will prevent incorrect uses of page object’s elements within test cases or somewhere else which will lead to serious maintenance problems. Remember that page object should merely expose high level actions which encapsulate all the interactions with the AUT.
- Page object’s methods should be in CamelCase with first letter in lowercase. Here are some examples: login(), loginExpectingError(), gotoCustomerPage(), registerCustomer().
- Methods of page objects should return a page object. It helps remove many page object initializations inside test code and we can sequentially call other methods after the first one.
In summary, they are practical items that you might apply to your projects in order to take the advantages of the Page Object design.
5. Get rid of TypeScript/JavaScript circular import
In a situation that more than one page object class has the same controls or methods (e.g. navigation bar for the most common), instead of duplicating code and having shared elements and methods in every page, the ideal solution is to have a parent class which abstracts the shared parts and has other classes to inherit from it. This way, the duplicated code will disappear and our page objects will be left DRY (Don’t Repeat Yourself).

With the above web design, we can quickly end up having a Parent page object which serves the encapsulation for the Navigation bar along with 3 Children page objects for Page A, Page B, and Page C which then extend the Parent page object. Accordingly, we will have 3 navigation methods such as: goToPageA(), goToPageB(), and goToPageC() inside the Parent page object. That means this Parent class will need to import all three child classes in order to return them in the three navigation methods.
⇒ Now, our code will have Parent Page imports Page A, Page B, and Page C.
On the other hand, all children pages also need to import their Parent page, so they can extend the inheritance of the Navigation bar.
⇒ Subsequently, our code will have Page A, Page B, and Page C imports Parent Page.
This kind of importing is called Circular Importing. Unfortunately, because it is not supported in TypeScript and JavaScript, you will run into trouble when running the test. The simplest way to fix this problem is to mix TypeScript and JavaScript together and avoid direct imports from the Parent page. Therefore, we will keep the code in Child pages as it is but change a little bit the Parent page’s code.
Below is a “bad practice” of importing all the dependencies in Parent page.

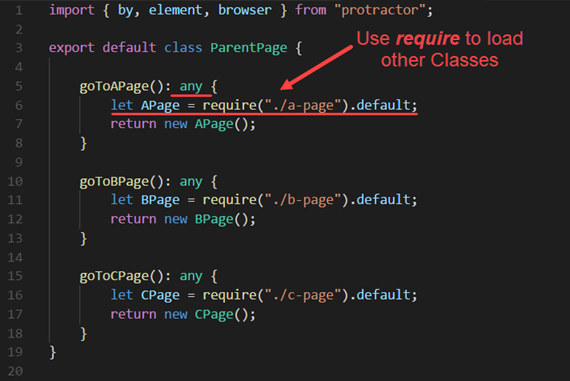
Instead, we should follow the “best practice” below.
 However, as you can see above in three navigation actions, one side effect to this solution is an unclear returned object type. This occurs because we are borrowing JavaScript loading syntax as an alternative for TypeScript’s import statement. But in JavaScript, the require only returns any type. So, when catching the returned object, which is any, we will need to cast it back to the exact type in order to be able to call its methods. Here is how we call this special page object’s method in the test.

6. Deal with JavaScript’s asynchronous behavior using async & await
I believe everyone has heard about the dreadful nightmare in JavaScript named Callback Hell or Pyramid of doom. It is a serious problem making code extremely complicated when we use too many Callback functions to make our code run synchronously. Luckily, JavaScript has been improved and we now have the async & await feature to deal better with the JavaScript’s asynchronous behavior.
Here are a few lines of code which illustrate the problem with JavaScript’s asynchronous behavior:

You might suppose the getText() method will return the text of the Welcome message. However, in fact, the method returns undefined because the nature of JavaScript is not to wait for the function to be completed before calling another function. We can simply resolve this issue by placing the magical async and await keywords in the code as below modified example.

Now, the above code will run exactly as we expect. It will wait for the getText() method to be completed before running the assertion. The magic does not come with only async and await keywords, it also includes the returned object of the getText() method, which is a Promise<string> object. That means the keyword await will only work if the method “promises” returns something by returning the Promise object. Together with Promise, async & await will help flat out our code and make it simpler and more understandable. Nevertheless, most, if not all, Protractor methods that we frequently used are already returning Promise, we can simply put await before them to make test script work as our expected order.
7. Wrap up Protractor element and browser original objects
Another best practice is not to use the original Protractor element and browser objects directly. Instead, we should create a wrapper for each of them as the way we centralize our customized code into a single place.
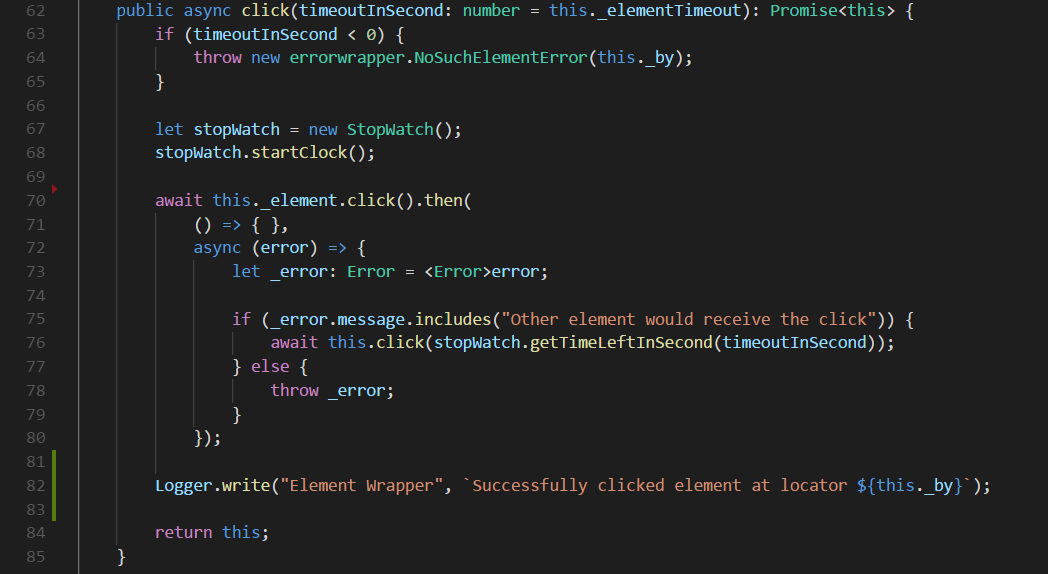
For example, we would create a wrapper for Protractor’s element class then implement all of the basic actions such as click(), sendKeys(), getText(), and so on. Thereafter, add some logs inside each method to monitor them during runtime or catch some famous Selenium WebDriver’s errors such as: StaleElementReferenceException or flaky “Other element would receive the click” issue and make a recursive call if needed.
Below code demonstrates how we should make a wrapper for the click method.

8. Page object’s method should wait for the page to be fully loaded before exiting
For some page object’s methods which result the changes in the AUT such as reloading page or redirecting to other pages, we should add at least one line of code to wait for the destination page to be fully loaded before exiting the current method. For example, we can wait for a control in the arrival page to be visible or wait for a spinner to be disappeared. In practical projects, this simple page wait mechanism has been proved to greatly increase the stability of the tests while the cost we pay for it is nothing more than a line of code.
For instance, the code below is the detail of a loginAsAdmin() method. I added a line to wait for the page to be completely displayed before returning another page object and exiting the action. The waitForLoginSuccess method is just a simple line of code where we wait for a Success message displays once logged in.

9. ProtractorBy is fastest but XPath is the most stable locator
Besides many Selenium WebDriver original locator types, Protractor also provides some more types for the By object which are tailor-made for finding controls in Angular application such as: binding and model.
It was my curiousity about the performance of the new ProtractorBy locator types that drove me to experiment and make a speed test for the 4 famous locator types: XPath, ID, CSS, and the new model (ProtractorBy). My test was particularly very simple, it just found a username textbox 10.000 times using Chrome browser. I ran the test 3 times in a row with the same machine and the results were surprising…
| # | Locator type | Average execution time in second |
| 1 | By.xpath(“//input[@id=’emailFieldNext’]”) | 147 |
| 2 | By.id(“emailFieldNext”) | 146 |
| 3 | By.css(“#emailFieldNext”) | 146 |
| 4 | By.model(“user.email”) | 111 |
From the result table I posted above, the By.model was clearly a winner since it only took 111 seconds for 10.000 look up attempts. On the other hand, the traditional locator types took up to 146-147 seconds to complete the same task. That means each look up using XPath will take 3.6 milliseconds more as compared with the built-in ProtractorBy model.
However, we should not worry too much about the performance of XPath. A few milliseconds slower in finding a control will not affect all of your projects. Nevertheless, the stability which XPath brings to the test execution is vitally important. Believe me, it’s really worth the extra effort to learn XPath because this technique will help you resolve all difficulties when locating web controls. Sometimes, a single element’s attribute will not be a good enough locator to rely on, a combination of multiple attributes will contribute a robust locator. XPath is the most powerful locating technique to provide more than 200 helpful built-in methods and an easy to learn and robust syntax to go through the XML document. The advantages of XPath have been proved themselves worthy in many projects I have worked on; XPath is absolutely my most favorite locating technique ever.
10. Test case should only call page object’s methods
This is a rule of thumb for boosting code reusability and maintainability. Even if you just need to click on a control, you still have to wrap the interaction in a page object’s method and call it from the test side. Doing this, when either the requirement or the AUT’s design is changed, makes the only place needing to be refactored just the page object’s method.
Below example shows us a very good way to implement the test.

11. Do not place assertions inside page object classes
The single responsibility principle is one of the famous SOLID principles of object-oriented programming which is intended to make software designs more understandable, flexible, and maintainable. If you are placing verification points inside page object classes, you are violating this principle, unintentionally making test script complicated.
Our suggestion is to have page object classes help interact with the AUT and also get what we need from the AUT. Then, we can use what we got to fulfill the test’s assertions. By doing this, we will take back the original responsibility of the tests and make the code clearer by avoiding hidden assertions in the page object classes.
12. Have simple but effective project structure
A good code project structure will help everyone catch up quicker with the project even it is large-scale. Below is my preferred structure in which I separated test code into three different sections.
- The first section is src and its sub-folders where I place my TypeScript code which is produced by me.
- The other section is the built folder where I tell the TypeScript Compiler (tsc) to store the transpiled JavaScript code which I will grab and run the test.
- The last node_modules folder will be automatically generated by installing new libraries using npm tool. So we should not modify its content manually.

13. Only push necessary things to code repository
With above project structure, the only files that we should push to the code repository are the TypeScript files (inside the src folder) and all the project configuration files (.json).
Reading the package.json and package-lock.json files, the npm tool will know what are the libraries we need to pull down to our local machine and the tsconfig.json file will help to tell TypeScript Compiler exactly how we would like it to transpile the TypeScript code. Thus, the built and node_modules folders are not necessary to push to the repository.
14. Remove boilerplate code of the long and repeated imports
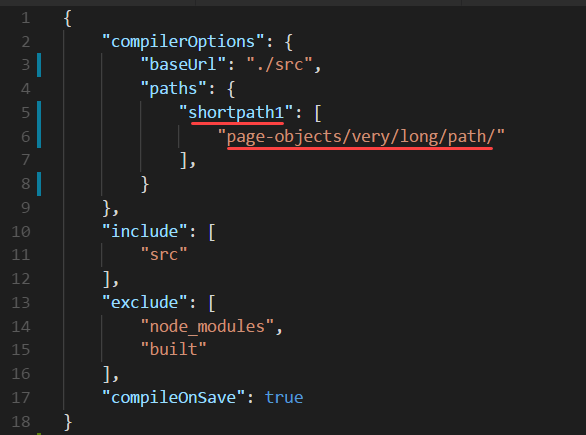
The import section at the beginning of each class is somewhat a boilerplate. From class to class, we sometimes have to write the same import statements which might be long and inconvenient. Fortunately, with TypeScript, we can make an alias for an import path and then reuse this alias everywhere in the project.
In the tsconfig.json file, we can create as many aliases as we want from the compilerOptions section as shown in the picture below. By having the aliases, you will not need to import the full path (e.g. “page-objects/very/long/path/”) but just the short alias of this path (e.g. “shortpath1”). The aliases will not only bring us extra convenience when importing but also help to prevent a problem when the import path is changed. We only need to update the actual path in one place rather than all the places where the import statements stated.

15. Test your test code more frequently
Automation testing framework is also an application which needs to be tested frequently. For even small changes or big updates, our test code needs to be carefully tested to make sure we are alerted if our code has any new unexpected issues.
The last best practice which I have been applying to every project is to build up a Continuous Testing pipeline where my lean and mean test suite runs automatically every hour or every time new change is pushed to code repository. The idea here is to more frequently test our code, we are trying to find new issues within code and even test environment sooner rather than later. And of course, the earlier you found the issues, the lower cost you need to pay for fixing them.
My favorite tool to build up Continuous Testing pipelines is Jenkins. You can be sure that Jenkins works really well with Protractor since all the execution commands are simply triggered via command line. With a few steps to create a dedicated job for testing our code, bugs will stay far away.
Conclusion
In conclusion, building a whole new Protractor Automation framework is not an easy task which can be done in a short amount of time. I already struggled with bad test design, unfamiliar JavaScript language and the new Protractor tool before I came up with the practices above. I wrote this article with the intent of saving other people’s time in finding ways to solve typical issues which might arise while developing a new framework. Even if you just started building up your Protractor framework-or already built one-I hope that my list of best practices will be of use to you and of benefit to your projects; the sooner the better. Let me know your thoughts and share your own opinions about this article by commenting below or shooting me an email via thanh.viet.le@logigear.com! Thank you.


Hi Thanh Viet Le! Very interesting and useful topic about protractor on Typescript! Is there is some example on github or somewhere else that I can see? would be great if you share some link.
Strong expertise and experience plus inside view of building a good open source framework.